While new furniture designs keep emerging nowadays, there is still nothing to beat the feel of grandma's furniture pieces that were worn out after years of use and abuse. Unfortunately, today, these old and antique furniture pieces are quite expensive, so if you want to recreate their warmth in your home, your best resort is to learn how to distress furniture.
What is Distressed Furniture
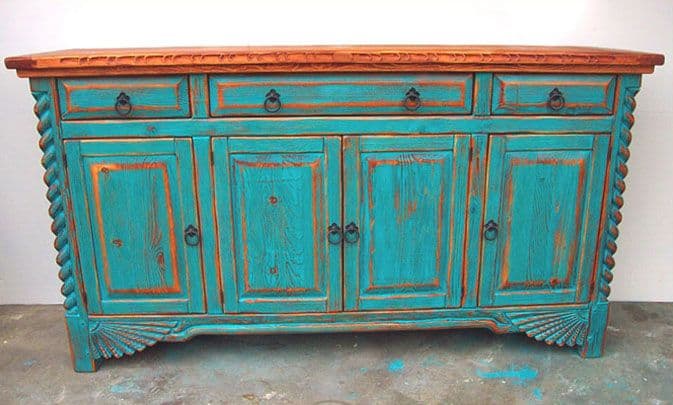
Distressed furniture is deliberately weathered or damaged to look like antique pieces. Distressing furniture is also called applying a patina and is a great way to improve a room's character and ambiance. Distressing wooden furniture pieces like cabinets, coffee tables, and consoles helps you prevent global deforestation as you can repurpose the pieces.
Luckily, you can use simple distressing techniques to give your wood furniture the best weathered look. When distressing furniture, you will be looking for two outcomes; to have your wood surface peeking through a coat of paint or to make your furniture look like it's been repainted several times.
If you are ready to distress your painted furniture, here are the supplies you need to succeed;
- Steel wool
- Tack cloth
- Candle wax
- Sandpaper
- Paint and paintbrushes
- Drop cloth
- Optional wood stain or polyurethane
- Piece of wooden furniture
Method 1: Distressing Furniture with Paint and Sandpaper

Here are the smile steps for DIY distressing when you have a free afternoon and all the supplies above.
Step 1: Prep work
Before you start distressing furniture, you need to protect your flooring and other features on the furniture that you don't want to distress. So, lay down some drop cloths on the floor to catch the dust and paint debris as you work. In addition, remove any metallic knobs and hardware and store them safely so you can reinstall them after the process.
Step 2: Clean and sand the entire piece
Use a dry cloth to wipe off any dirt or debris on the surface, including the top and legs. Then, get your sanding block ready and start sanding the surface.
You will also need to consider two options for sanding; if the piece of furniture is old or has been repainted several times, you will need to thoroughly sand or even use a paint stripper to remove some color. In contrast, you can lightly sand a new or unfinished piece of furniture.
When you have sanded the piece to satisfaction, use the tack cloth to wipe off the debris and dust. When doing so, ensure you wear protective gear to prevent inhaling the elements.
Step 3: Start painting
There are three ways you can paint the piece of furniture for the best results. Firstly, you can use a single coat of chalk paint for a matte finish and have bare wood surfaces peeking through the paint for a good distressed look.
On the other hand, you can make your furniture look like it was painted several times before by applying two coats of paint. You can also use wax to get the best impression of a piece of furniture painted at least twice over the years. In this case, you want to apply the wax to some parts of the furniture, then apply two colors of paint, so one peeks through under the topcoat.
To use the wax, first, apply a base coat and then rub a few spots on the surface with a candle, especially on the edges and corners. After the base coat has dried, apply a second color over the entire surface, even over the wax. Since the paint will not stick to the wax, you will achieve a heavily distressed look with a mix of colors when you remove the wax.
Whichever distressing technique you choose, ensure you paint the piece uniformly, then give it ample time to dry completely. The drying time can be anything from a few hours for a single coat of chalk paint or overnight when you apply more coats.
Step 4: Use fine-grit sandpaper to distress the piece
You will need to sand the piece once the paint is dry. But, before you start sanding, you will need to use a ball of steel wool, especially if you used the wax distressing technique. If you did, go over the waxed areas with the steel wool until it all comes off. However, be careful not to damage the base coat with the steel wool completely.
If you did not apply two paints, you could start removing the paint using the fine-grit sandpaper, or you can also use the steel wool for extra damage. First, use the steel wool to expose bare wood on the edges and corners, then use the sanding paper to damage the flat surfaces carefully.
When you have achieved your best shabby chic look, use the tack cloth or paper towel to wipe off the paint debris, again ensuring you wear protective gear, so you don't inhale the elements.
Finally, you can also apply a stain if you want a heavily distressed piece of furniture. The stain can make your furniture look more antique, thus making it the focal point of your living space when furnishing your house. You can apply one coat of the stain, then use a soft rag or tack cloth to wipe off the excess.
Avoid rubbing the paint in circular motions as that would make the distressed look obvious. Rather, it is best to run the paintbrush straight and give the stain apply time to dry completely.
Step 5: Seal the surface
When you have achieved the best look, you need to use a top coat to seal the effects. For this step, you can use polyurethane paint as it will provide the best satin finish. Ensure you get clear polyurethane to maintain the undercoats and apply it evenly to the entire surface. When done, allow it to dry before fixing the knobs or metallic hardware you had removed in step 1 above.
Here is a video to help you with these wood weathering steps:
Method 2: How to Distress Furniture By Scraping

While paint brushing and then sanding your furniture is the easiest way for beginners to distress furniture, you can also scrape some paint on the surface to achieve an even older look. For this method, you will need;
- Best paint
- Putty knife
- Sanding sponge
- Paint scraper
Step 1: Prepare your workspace
Before you start painting, prepare the area by laying some drop cloths to protect your flooring. In addition, also remove hardware and knobs you do not want to weather.
Step 2: Sand the piece of furniture
If your furniture is unfinished, you can lightly sand using a sanding sponge. On the other hand, you need to use steel wool or more sanding power to damage older paints on the surface.
Step 3: Start painting
When your surface is ready for distressing, you can use the putty knife to apply the paint of your choice. Using a putty knife instead of a paintbrush will give your furniture the most authentic look you cannot find anywhere else.
Start by scraping a thin coat of paint, spreading it unevenly across the surface and then letting it dry. After the coat dries, scrape on another thin coat, leaving uneven coverage, so that bare wood still shows after the application.
Note, you can use different colors when you want your furniture to look like it's been painted several times before. However, if using different colors, you must let each layer dry completely, so the colors don't blend in together.
Step 4: Scrape off some paint
When your paint is completely dry, you may now start the distressing process using the paint scraper. First, scrape off paint from different places on the furniture until you get an even and desired look. It is best to scrape layers of paint ununiformly across the surface, especially when you have used more than one color to show bits of color and bare wood in some spots.
Step 5: Seal with a topcoat
You can choose to leave your weathered furniture as is, or you can also add another layer of polyurethane paint or dark wax to seal in the paint and give them more durability. After this step, you can also fix the knobs and other parts you removed above.
Method 3: Distress New Furniture by Dry Brushing

While the two methods above are ideal for new and old furniture pieces, this dry brushing method is best for new pieces of the furniture you need to give a weathered look. You will only need:
- Paints
- Dry paintbrush
- Paper towels
- Drop cloth
Step 1: Prepare the work area
Start by laying the drop cloth on the floor to catch any paint debris. You can also remove some fixtures on the piece of furniture that you don't want to weather.
Step 2: Start painting
Use a paintbrush to apply a normal coat of paint on your furniture, then spread it further using another dry paintbrush. Ensure to dry off any extra paint from the dry brush using the paper towels. It is very important only to apply a thin coat of paint for this method to avoid drenching your dry paintbrush.
When you have spread the paint evenly across the surface, leave it to dry before adding another layer of sealant paint. This easy method will leave you with a slightly weathered piece of furniture.