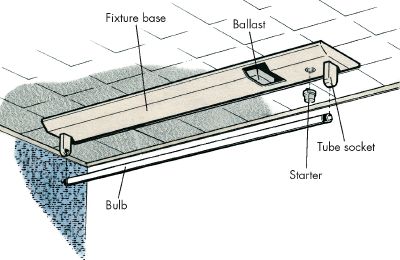
If you use plug-and-play LED tube lights or fluorescent tubes in your home or office, you will need a ballast light fixture to run things smoothly. The fluorescent light ballast is more energy-efficient, and the bulbs last a bit longer than incandescent light fixtures.
This guide will enlighten us on how the ballast light fixture works and, even better, how you can replace the ballast by yourself. Let's dive in.
What is the ballast fluorescent light fixture?
A ballast is also commonly referred to as a control gear. It is a device used with a discharge lamp to acquire the required circuit condition for starting and functioning. Basically, the ballast gives the light a boost of voltage to start and run safely. Therefore, the ballast is important to help any fluorescent and HID lamps run smoothly.
To start a fluorescent light ballast, there must be a production of an arc between two electrodes in the lamp. The arc appears when the ballast supplies the right electrical current and voltage to start or strike the arc. Then it limits the voltage and current to produce enough to provide steady light output.
Without the ballast, the tubes will draw power from the high voltage power source directly, rapidly and uncontrollably, increasing its current draw causing the fluorescent lamp to overheat. Now that you understand what a ballast is let us look at how the ballast light fixtures work.
How do the fluorescent lights ballast work?
Fluorescent light ballast usually come in two main types: electronic or magnetic ballasts. Electronic ballasts are the most commonly used since magnetic ballasts are somehow outdated. Therefore, we will have a look at how a ballast works. Usually, there are two main types of electronic ballasts: the instant start method and the programmed start method.
1. Instant-start method
The instant start ballast is specially developed so that the fluorescent lights can turn on at the first flick of the switch. The instant start ballast will use a high voltage power source boost of around 600 volts to heat and light while at the same time regulating the current flowing to the light.
This small device is energy efficient, but it tends to have a shorter life span because of the voltage surge every time they are switched on. For that reason, these fluorescent light ballasts are ideal for areas that will have power on for long periods.
2. Programmed or rapid start method
The programmed start is also referred to as the rapid start ballast. These ballasts are usually more energy-efficient than other ballasts. This is because there are usually designed for areas where the lights are constantly switched on. The rapid start ballasts usually preheat the electrodes with a specific voltage controlled by a higher voltage to start the light.
How to replace a Ballast light fixture
Replacing a ballast is a process that is straightforward and will only take around ten minutes. However, before you even get started, you must ensure that you turn off the power to the fixture. Remember that turning off the light switch is not adequate, and you will need to turn off the circuit breaker that controls the circuit powering.
Tools and Materials required
- New ballast
- Wire connectors
- 4-in-1 screwdriver
- Nut driver
- Wire stripper/cutter
1. Step one: Remove the Cover
When you have made sure that you have unplugged the fixture or turned off the power from the circuit breaker or the main power, the first step is to remove the cover. You will only need to grab the outer edge of the lamp and pull it gently down from the fixture. However, you should know that this process may vary based on the light fixtures you are using. Some will be attached with clips or nuts, which you will need to remove gently.
2. Step Two: Remove the Fluorescent Tubes and Cover Plate
When you have removed the cover, you will need to remove your tube and cover plate. To remove the tube, you will gently grab the lamp or tube and twist it to a 90-degree angle. Then, when you see the metal that connects it at the ends, you will pull the bulb down gently.
You will then look for the wiring cover plate when successfully removing the tube. It is located at the central part of the fixture in most cases. There is usually a tab on the sides of the plate cover that catches in slots in the lamp fixture. You will need to squeeze the sides of the plate cover to slide the tabs and then gently pull the cover down.
3. Step Three: Disconnect the Ballast Wires
Before you disconnect or cut the wire, you must ensure that the power is off. You could use a non conduct voltage tester to check if there is no voltage present in the wires. If there is no voltage, then you can go ahead and snip the old ballast wiring using side-cutting pliers or wire snip, at least a couple of inches from the end of the fluorescent ballast.
About four to eight wires are coming from the ballast, and you will need to cut them all. Before cutting the wires connected to the ballast, you could use your phone to take a photo of the ballast and wiring so that you will not have a hard time fixing your new ballast.
4. Step Four: Remove the old ballast
The next set will be removing the old ballast. First, you will need to support the ballast using one hand, then use the other hand to unscrew the wire nuts or bolt using a nut driver or sockets wrench. There will be one on two mounting nuts depending on the ballast light fixture.
5. Step five: Installing the New Ballast
When installing new ballast, you will use mounting nuts or bolts. Next, you will use wire connectors to connect the ballast wires to the fixture wires to match the original wiring. This is where the photo you took earlier will help.
You will reinstall the cover plate, light bulbs, and the outer cover or fixture lens when you are done. Turn the power on from the main switch or circuit breaker when everything is set. Then you will need to test the fixture for proper operation.
What Are The Signs of a Bad Ballast?

Image credit: youtube.com
The amazing thing about ballasts is that you can get a new ballast from a hardware store. Also, a ballast can last up to twenty years in good conditions, but the lifespan can decrease dramatically in cold environments. So before you toss your bulbs or lamps in the trash, you could look at some of these common signs that cause a ballast failure.
1. Buzzing
This is one of the most common signs that will show that you need to replace your ballasts. It is a strange sound from the bulbs, lamps or light fixtures. It sounds more like a buzzing or humming noise. The noise shows that the ballast is struggling to maintain the electric current, which causes audible voltage regulator problems.
2. No lights at all
If you experience total blackout since your bulbs or lamps won't turn on, there is a high chance there would be a problem with the ballast. Nevertheless, you might find that there is a possibility that the lights went off due to other natural causes, so you can assume it's the ballast.
3. Dimming or flickering
If you notice dimming or flickering on your bulb or lamp, there is a fat possibility that the ballast is faulty. Another issue could be water damage causing the ballasts to struggle while regulating the current.
4. Burn marks
Often you can see burn marks, especially on the ends of a fluorescent tube, meaning there is an issue with the ballast. This means you might need to replace it because it can not handle the current, probably overloaded. In most of these cases, you might need to replace even the bulbs.
5. Changing colors
The light output should produce a consistent brightness and hue. If you see a variance in brightness or color, the chances are that the ballast might need replacement.
6. Swollen casing
You might also notice swelling or bulging on the plastic part, which means the ballast is faulty and needs replacement. This is caused by energy overload or damage to the box in most cases.
Frequently Asked Questions on Ballast Light Fixture
1. What is a ballast factor?
A ballast factor is a specific number that is between 0.07 and 1.2 that indicates how much light a lamp or bulb emits with that specific ballast. For example, a fluorescent system with a ballast factor of <1 will produce less light or lumen.
2. Can you replace a ballast yourself?
Yes, you can easily replace a ballast by yourself and as we have indicated earlier, replacing a ballast is a process that will take around 10 minutes.
Image source: google.com


